 |
S10 Truck, Aluminum third-door handle,
for 19962003 Chevrolet S10
and GMC Sonoma extended cab trucks
Stealth Conversions
The Parts Division of JTR (Jaguars That Run)
|
|
|
contact us |
|
|
| Home/Site Map | About JTR | Jaguar | Chevy
S-10 | Chevy
TPI & TBI | Astro
Van V8 | Volvo
200 | Volvo
700 | Datsun
Z Car |
|
Please Use the Books Ordering Form to
order manuals! |
|
|
back to S10 Parts Order Form
| Aluminum third-door handle for 1996–2003 Chevy S10 & GMC Sonoma |
|
|

Aluminum third-door handle, for 1996–2003 Chevrolet S10 and GMC Sonoma extended cab Trucks |
|
|
The handles for the third-door (or cargo door) are injection molded plastic. While cheap to manufacture and rattle-free, they are notorious for breaking
|
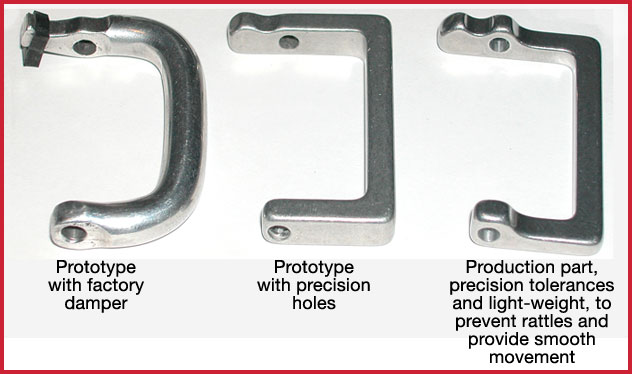
Replacement handle developed by Stealth Conversions |
|
Stealth Conversion’s replacement third-door handle is made in America, from heat-treated aircraft aluminum, which will not break..
The plastic handle provides lubricity between the moving parts. The aluminum handle requires grease to function smoothly. The rounded contact suface helps retain grease. The holes for the pivot pins are carefully machined to prevent rattling, while leaving enough clearance to retain grease.
The handle is light-weight so that it will not rattle — it weighs about the same as the plastic handle. |
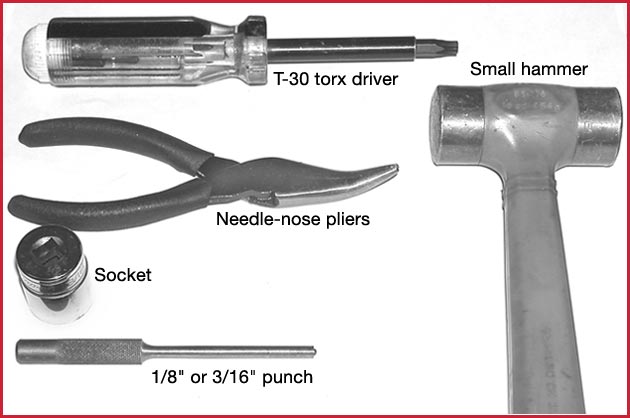
Tools for installation of handle |
Tools Required:
- T-30 torx
- small knife or small flat screwdriver (not shown)
- needle nose pliers (bent nose preferred)
- socket
- 1/8" or 3/16" punch (a small screw driver, or a nail can be substituted)
small hammer.
|

A knife is used to remove handle assembly. |
REMOVING HANDLE ASSEMBLY
Remove the screws with a torx driver (size T-30).
After removing the torx screws, use a small knife (or small screwdriver) to gently pry the handle assembly from the door.
|
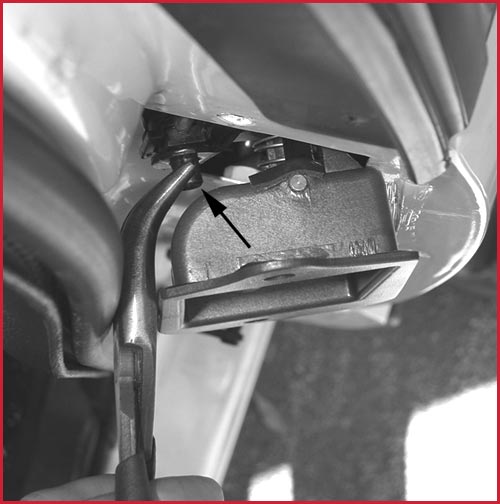
Removing the Clip |
|
Maneuver the handle assembly to get access at the plastic retaining clip (arrow).
Gently squeeze the retaining clip with a needle-nose pliers, as shown, so it can be detached from the handle assembly
|
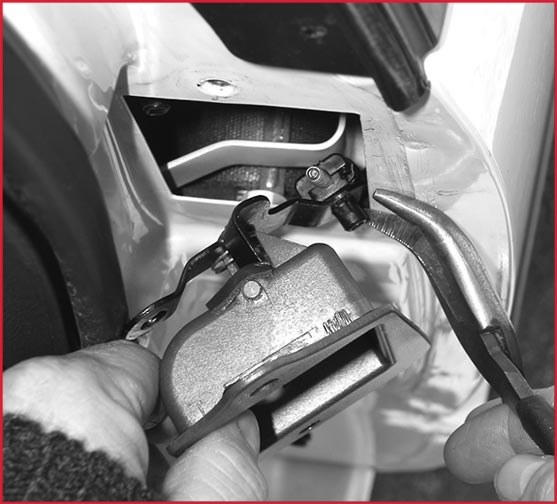
Removing second clip |
Maneuver the handle assembly as shown, for access to the second clip.
After removing the second retaining clip, remove the handle assembly from the door.
|
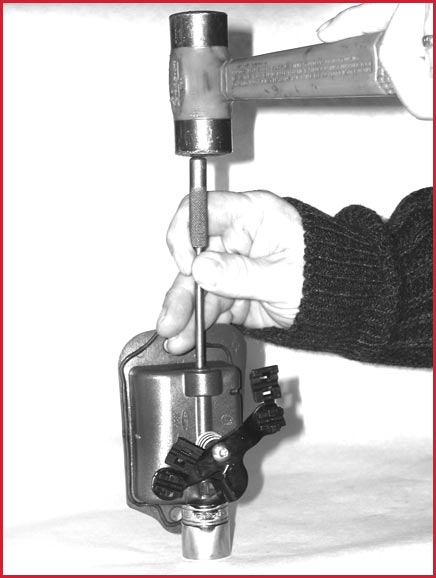
Pivot pin removal |
REMOVING PIVOT PIN
Place the handle assembly up-side-down on top of a socket, as shown, so the pivot pin can be removed.
Gently hammer on the pivot pin with a 1/8" or 3/16" punch as shown. A nail or a small screw-driver can also be used.
Do not use pliers to remove the pivot pin from the housing, or it may nick the pivot pin, and cause installation problems. |
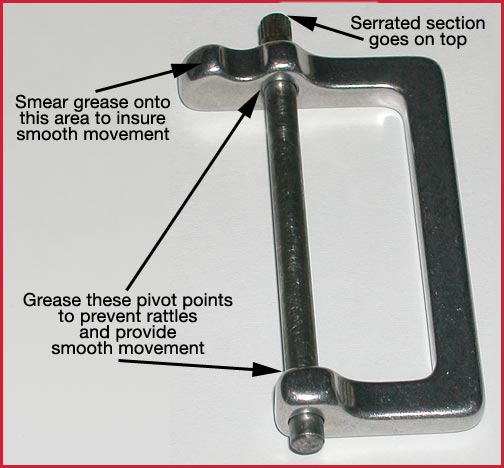
Handle and pin grease points |
Test fit the pivot pin into the aluminum handle as shown to insure that it slides into place, and spins easily.
If the pivot pin does not easily slide into the handle, check for nicks or scratches on the pivot pin. If any nicks or scratches are found, use a file or sandpaper to smooth the rough spots.
After insuring the pivot pin slides into the aluminum handle, put some grease in the pivot holes, and the area the arrow points to.
Install the aluminum handle into the plastic housing.
Install the pivot pin, noting that the serrated portion of the pin goes on top.
Gently tap the pivot pin into the plastic housing until it is fully seated
|
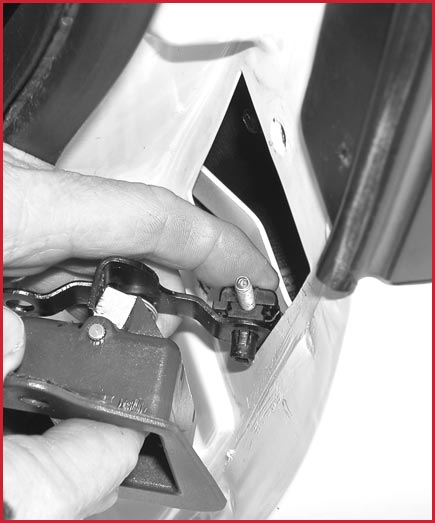
Handle assembly installation |
INSTALLING HANDLE ASSEMBLY
Install the plastic clips onto the handle assembly.
First, attach the lower rod to the handle, as shown, using your finger to seat the retaining clips.
Next, attach the upper rod.
Maneuver the handle assembly into the door. |
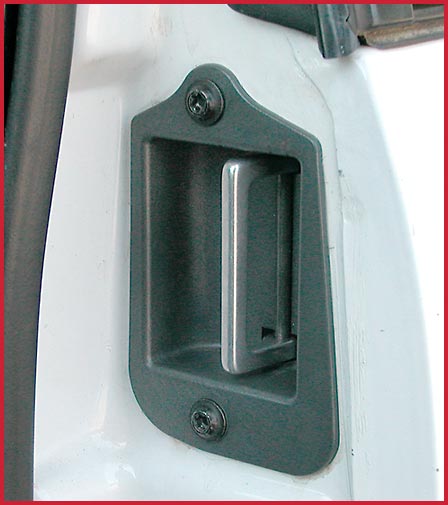
Finished |
FINISHED INSTALLATION
Fasten the handle assembly to the door with the torx screws, and verify the handle works properly.
If the door does not open properly, remove the handle assembly and adjust the position of the plastic retaining clips on the pull rods.
The finished installation has an attractive appearance. Note that the handle provides plenty of finger clearance, unlike other after-market aluminum handles currently being sold.
|
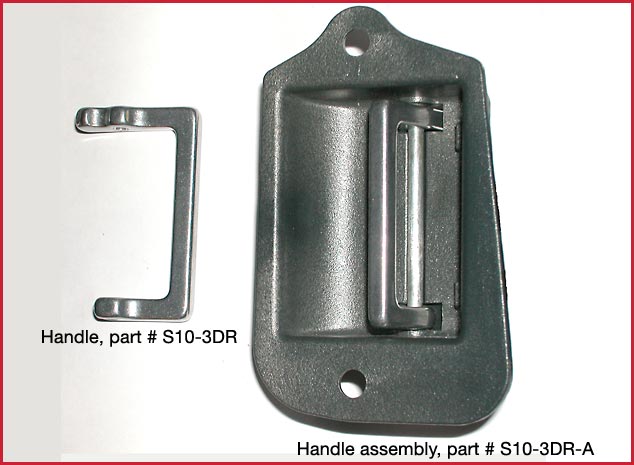 |
Stealth Conversions replacement 3rd door handle, #S103DR |
|
Stealth Conversions Complete GM Assemblly with installed aluminum handle, #S103DR-A |
|
|
The Stealth Conversion’s third-door aluminum handle (part # S10-3DR) can be purchased for $24 (including shipping by First Class Mail).
For those who prefer a complete assembly, a brand new GM handle assembly, with the aluminum handle installed (part # S10-3DR-A) can be purchased for $75 (including shipping by First Class Mail).
|
|
|
| Home/Site Map | About JTR | Jaguar | Chevy
S-10 | Chevy
TPI & TBI | Astro
Van V8 | Volvo
200 | Volvo
700 | Datsun
Z Car |
Jump
Back to the Top
JTR engine swapping manuals are available directly from JTR Publishing,
As well as through a number of retailers, including:
• Summit Racing (S-10: Part #JTR-S10; Jaguar: Part #JTR-JAG),
• JEGS (S-10: Part #116549; TPI &
TBI: Part #117942),
• Steve Smith Autosports (S-10: Part #S212; TPI & TBI: Part #S195), and
• Classic Motorbooks (S-10: Part #116549; TPI & TBI: Part #117942;
Jaguar: Part #118438; Datsun Z: Part #115501; Volvo 200: Part #122587).
© JTR
All rights reserved. |
|